


In this article by ANY.RUN analysts, we’ll discuss the GuLoader malware and how to deobfuscate its code using the Ghidra scripting engine.
We will:
- Identify obfuscated code patterns
- Develop an algorithm to deobfuscate and optimize these code patterns
- Write a script to semi-automate the code deobfuscation process.
We also detailed the obfuscation techniques for junior analysts. And mid-level and senior analysts will find strategies and tools for simplifying and deobfuscating GuLoader and other malware.
Without further ado, let’s get into the analysis.
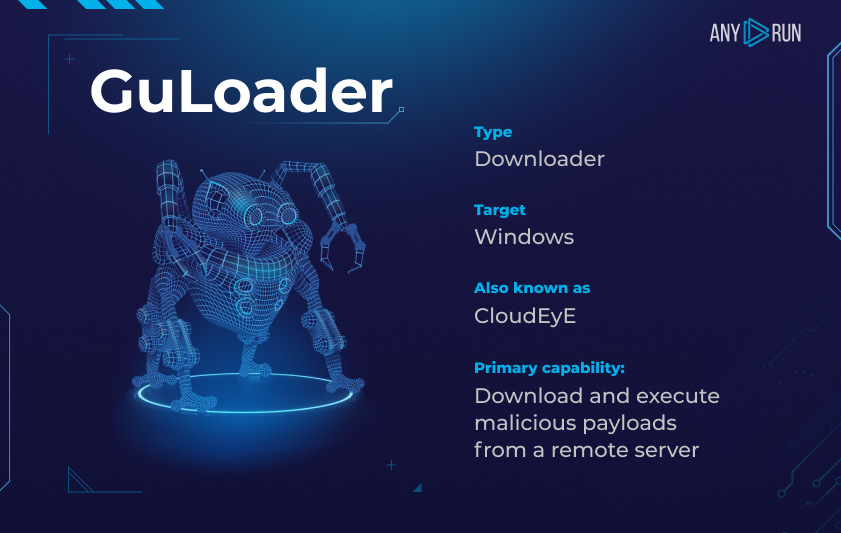
Brief Overview of GuLoader
GuLoader is a widely used malware loader known for its complex obfuscation techniques that make it difficult to analyze and detect.
Here’s some general information about this threat:
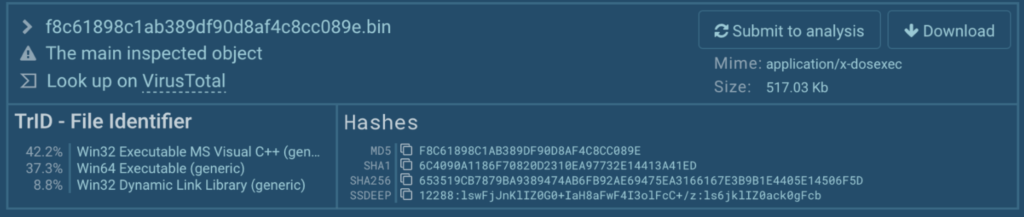
We are going to examine a GuLoader sample with the first submission time 2023-03-28 and SHA256 hash:
| 653519cb7879ba9389474ab6fb92ae69475ea3166167e3b9b1e4405e14506f5d |
You can download the original sample from this link.
Clearing the way: Why Deobfuscating Code is Crucial Before Analysis?
Deobfuscating code is an essential step in the process of malware analysis. When malware authors create their programs, they often use various obfuscation techniques to make it more difficult to understand and analyze their code.
By deobfuscating the code, analysts can gain a better understanding of the malware’s functionality, identify its capabilities, and develop effective mitigation strategies.
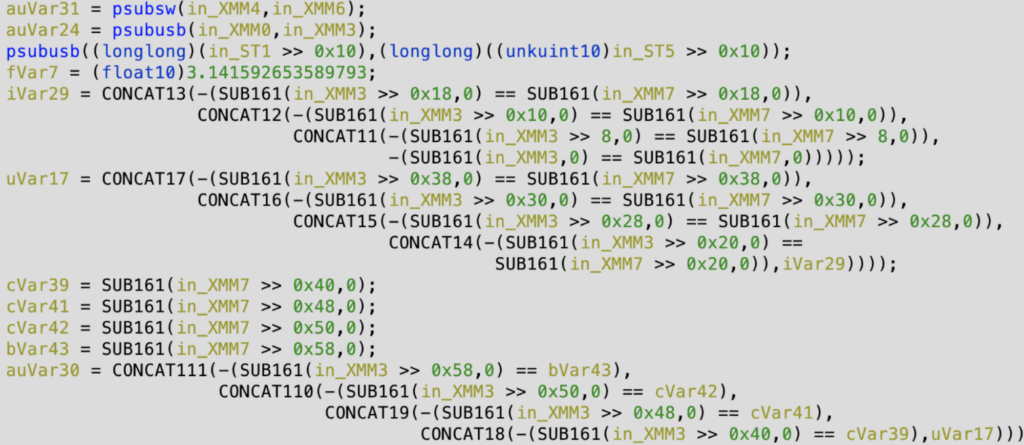
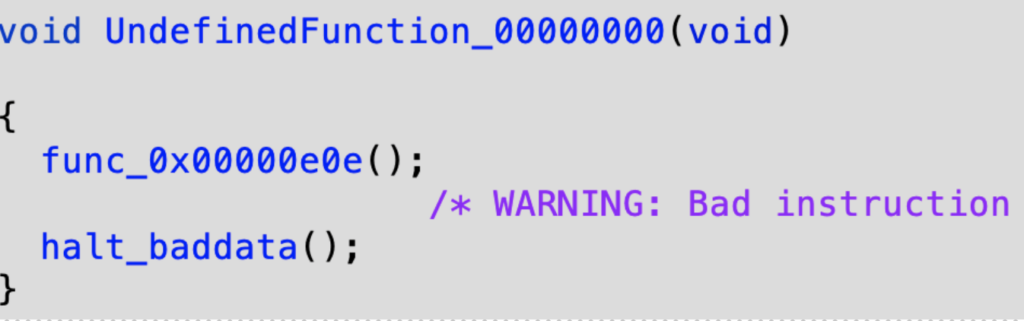
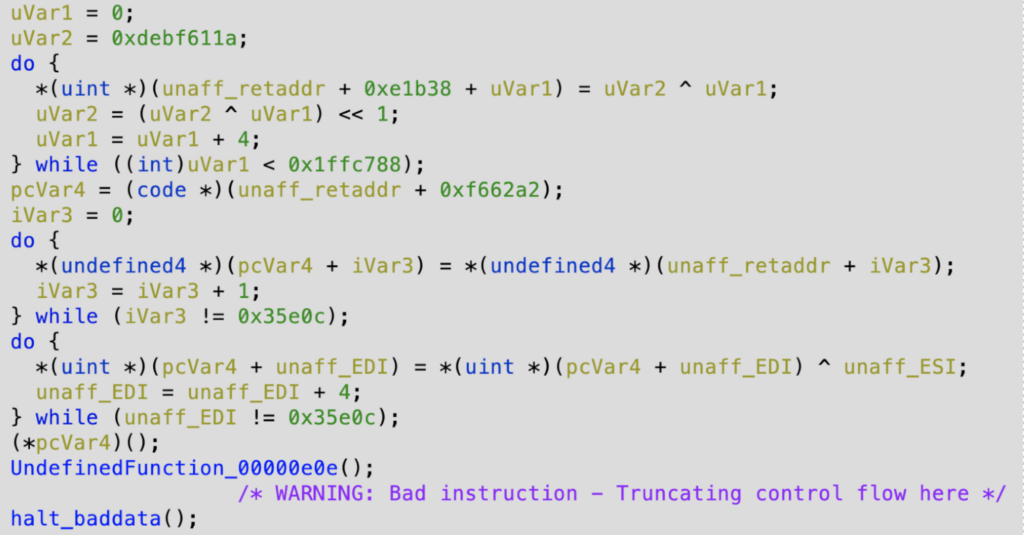
Consider this picture where Guloader’s sophisticated assembly code is decompiled into ugly pseudo-code:
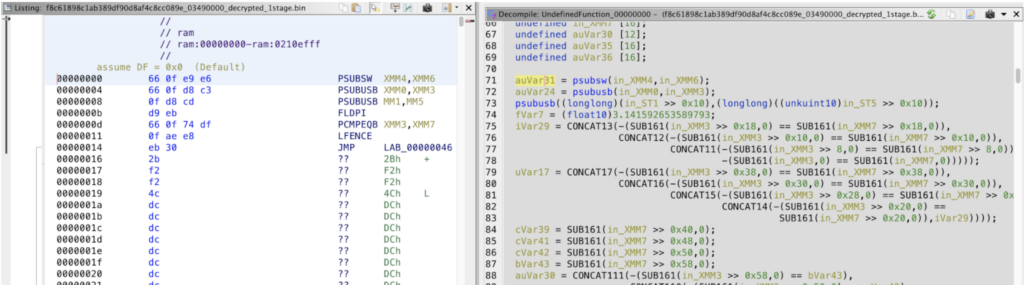
Obfuscation used in the code makes it almost impossible to understand what’s going on. That’s why today we will focus on deobfuscation — it will help us gain a better understanding of Guloader’s behavior.
By the way, if you want to see more examples of analyzing obfuscated code, check out our deep dive into CryptBot.
Unpacking Guloader’s Shellcode
Unpacking GuLoader’s shellcode is rather straightforward.
Start by reaching the entry point of the malware. Once identified, set a breakpoint at the VirtualAllocEx function. This function is used to allocate memory for the GuLoader’s shellcode. The first break point should occur when the function finishes executing and the memory has been allocated.
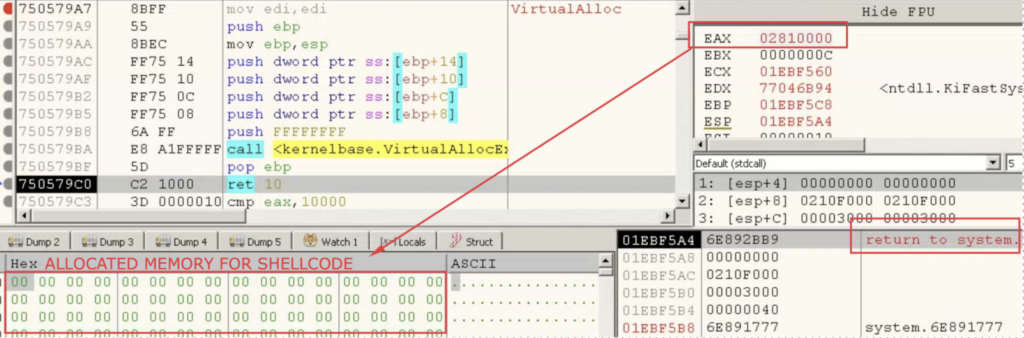
Note that the return address in the stack the ‘System.dll’ module — not the executable itself. This means that the malware brings this module with itself.
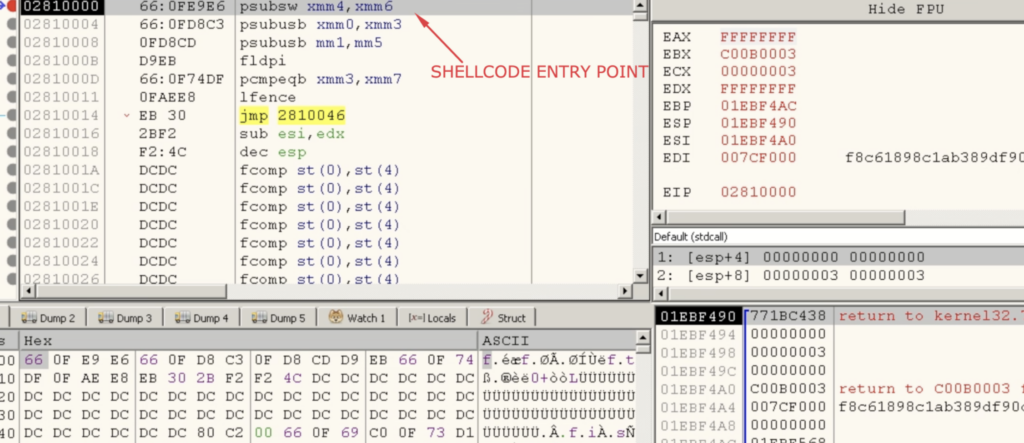
At this point, set a hardware execution breakpoint at the first byte of the memory address returned in the EAX register. This will create a break at the first instruction of the shellcode.
After setting this breakpoint, run the malware. When the breakpoint is hit, you will be at the first instruction of the shellcode.
To further analyze the shellcode, navigate to the memory map and create a dump of the memory region allocated by “VirtualAllocEx”. This dump can be loaded into a disassembler, allowing you to analyze the shellcode in more detail.
It is worth noting that, we used Windows 7 (x32) as our unpacking environment. Keep in mind that the algorithm will be slightly different for the other OS versions. If you don’t have time or a suitable environment to unpack GuLoader shellcode by yourself, you can download an archive with an already unpacked sample from our GitHub repository (password: infected).
Identifying Obfuscated and Junk Code Patterns
In this section, we will search for junk and obfuscated code in GuLoader’s shellcode to use them as templates for deobfuscating and optimization techniques.
XMM instructions
There are many XMM instructions present in the code. They look chaotic and complicate the analysis process. We encountered them from the first byte of the unpacked shellcode:
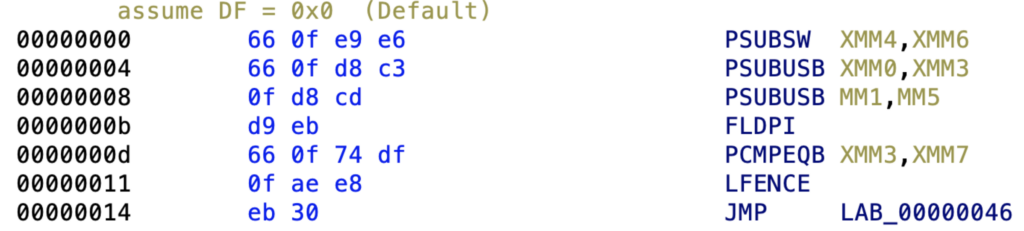
these instructions are quite effective at obfuscating the code, as they can break many emulation engines. That’s Because most of them are not supported by default. We have tested Angr, Triton as well as Ghidra embedded engines – all of them failed.
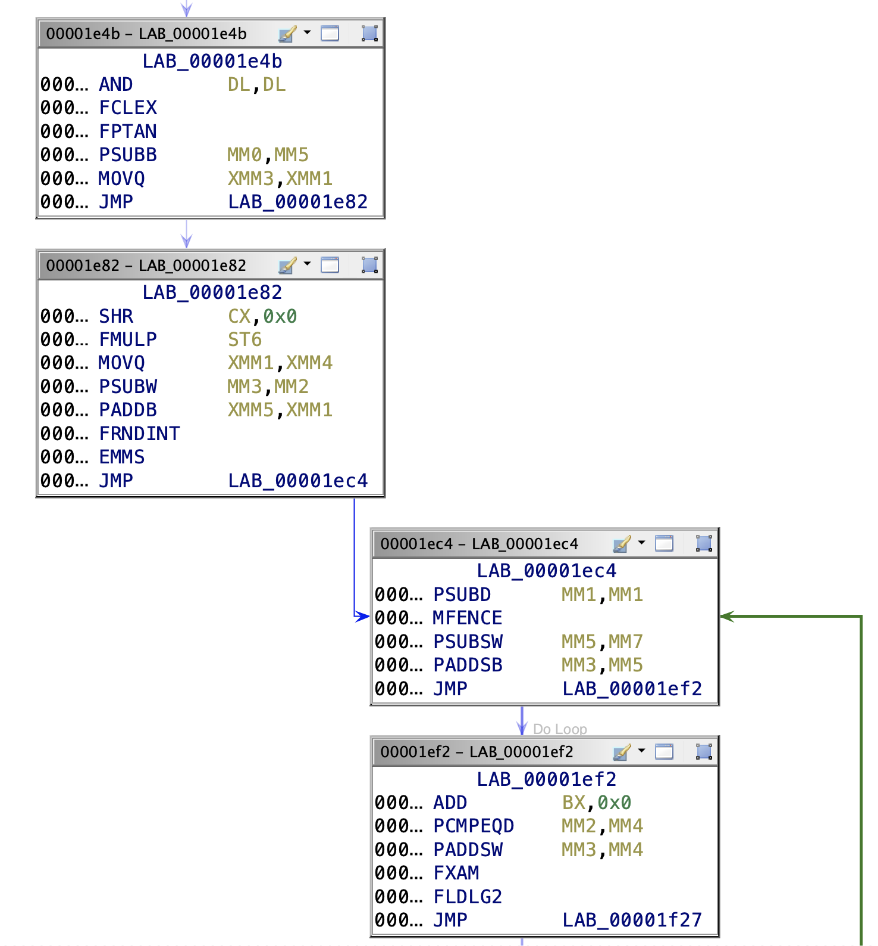
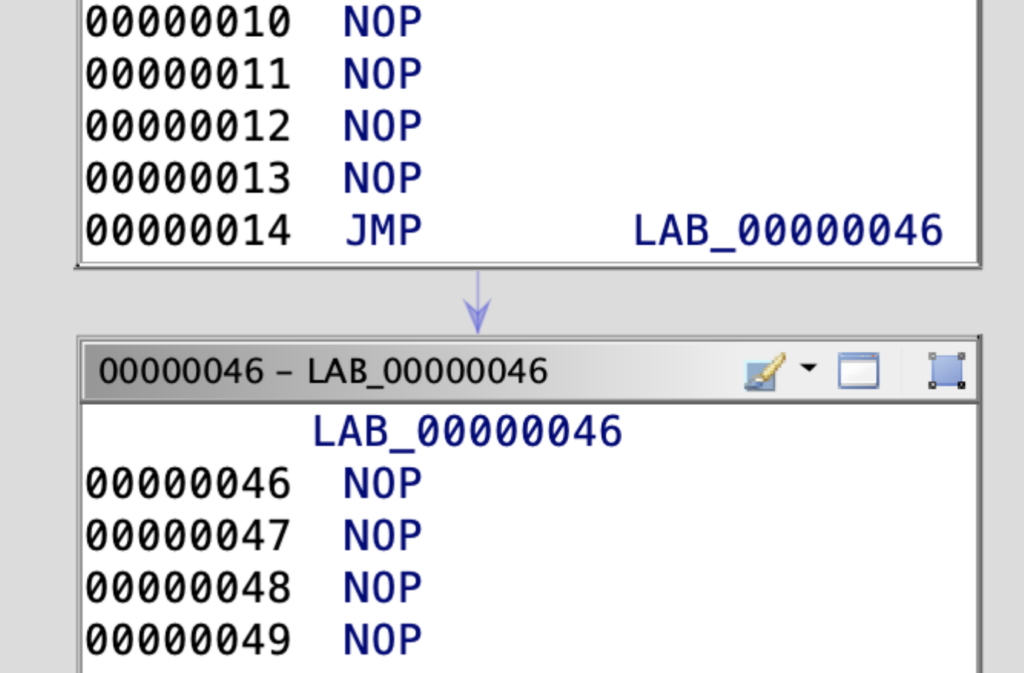
Unconditional JMP instructions
Guloader authors used lots of JMP instructions to divide the code into small blocks and connect them together. Not only does this technique make the code more difficult to analyze, but it also prevents detection by antivirus software and other security tools. What’s more, jumping between these blocks can be quite tedious and annoying for analysts, especially when dealing with a large amount of code.
Junk instructions
The GuLoader code contains junk assembly instructions, which are often incorporated as an extra layer of obfuscation to complicate its analysis. These instructions have no practical function, generally leaving the value of registers, execution flow, or memory unchanged. Their purpose is to hinder analysis and obscure the genuine functionality of the code.
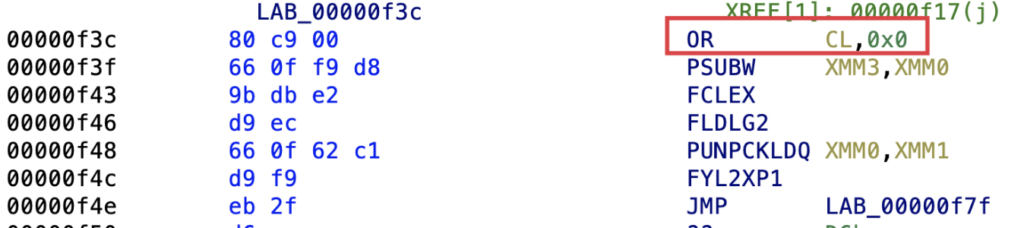
We may highlight instructions that perform no operation (“NOP”, “FNOP”), and instructions that shift or rotate a value by zero bits (“SHL reg, 0”; “ROL reg, 0”). Also, the code may contain instructions like “OR reg, 0”, “XOR reg, 0”, “CLD”, “WAIT” and others, which are equally useless, making no impact on the code’s behavior.
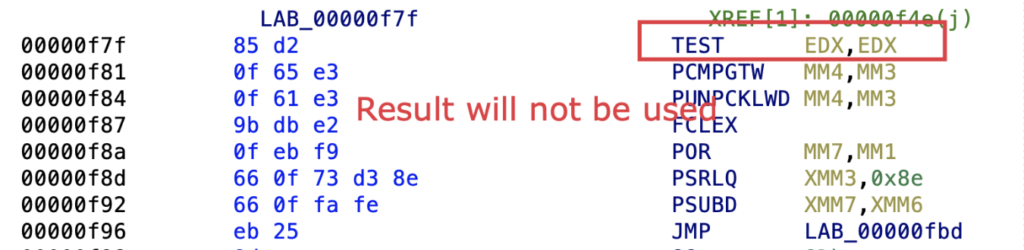
Fake comparison instructions
GuLoader code frequently utilizes fake comparison instructions for obfuscation. These instructions usually involve comparing a register or memory location with a fixed value, like “CMP EAX, 0” or “TEST EDX, EDX”. Yet, the outcome of these comparisons isn’t applied in following instructions, rendering the comparison pointless.
Fake PUSHAD instructions
The use of fake “PUSHAD” instructions, when paired with a corresponding “POPAD” instruction, is another common obfuscation technique used in the GuLoader code.
These instructions can be used to temporarily modify the values of registers between the “PUSHAD“ and “POPAD” instructions. However, the final “POPAD” instruction restores all registers to their original values, effectively nullifying any modifications made by the code.

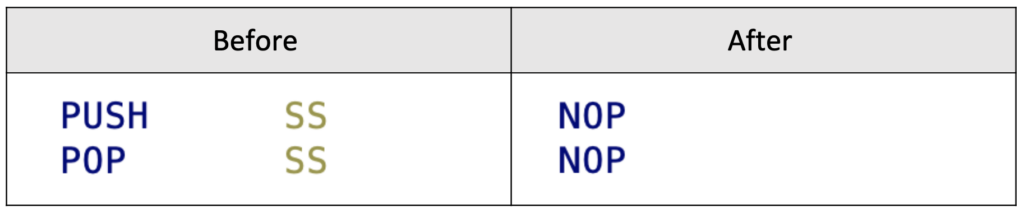
Fake PUSH instructions
The use of fake “PUSH” instructions is yet another obfuscation method that is rather similar to the previous one. These pairs of instructions involve pushing a value onto the stack and then immediately popping it off again.
For example, the code may include a “PUSH SS” instruction, followed by one or more instructions that modify the value of a particular register or memory location. However, when the corresponding “POP SS” instruction is executed, the content of the stack pointer is restored to its original value.

Opaque predicates
GuLoader code also incorporates opaque predicates to increase the difficulty in comprehending the code’s logic. These predicates are essentially conditional statements that consistently evaluate to either true or false. However, they are designed to be challenging to analyze or predict.
For example, the code may include a pair of instructions such as “MOV BL, 0xB6” and “CMP BL, 0xB6”, followed by a conditional jump instruction such as “JNZ ADDR”. However, since the value being compared is the same as the value that was just moved into the register, the comparison will always evaluate to false, making the conditional jump unnecessary and confusing.

Fig. 11 — opaque predicate that is always evaluates to false
Arithmetic Expressions
Obfuscated arithmetic expressions are one of the most interesting obfuscation methods used in GuLoader to make the actual arithmetic operations harder to understand. These expressions involve arithmetic instructions like addition, subtraction, and exclusive or, which are mixed with other obfuscation techniques such as fake comparisons, opaque predicates, and junk instructions.
One example of arithmetic obfuscation in GuLoader code is to move a constant value into a register and perform arithmetic operations on it:
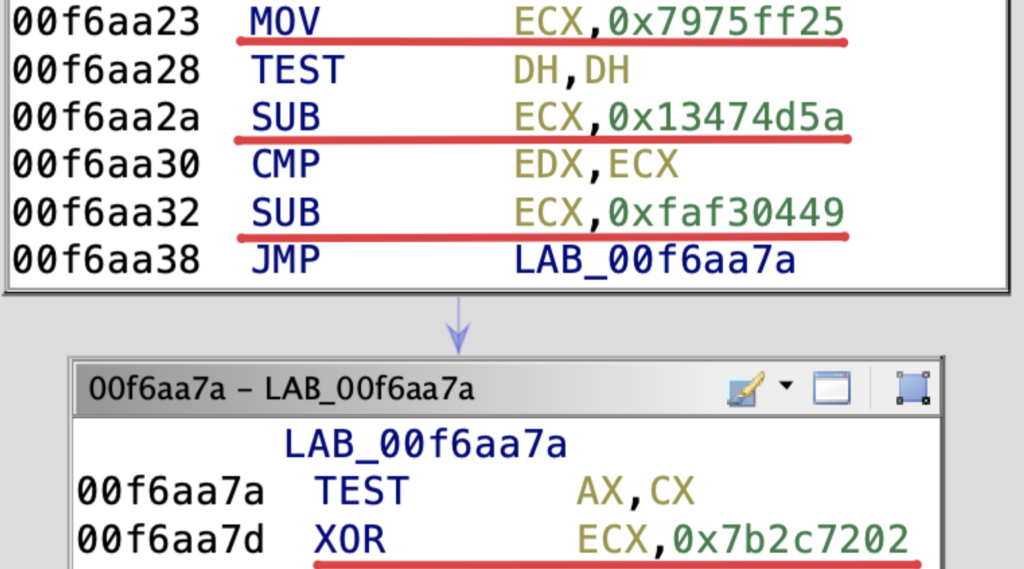
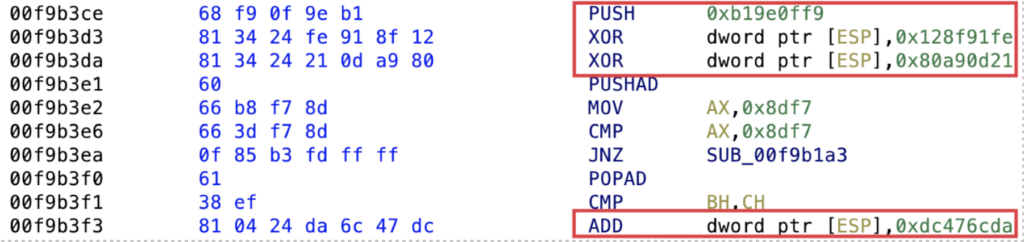
Another example is to push a constant value onto the stack and perform mathematical operations on the memory located on the stack:
Deobfuscating and Optimizing: Techniques and Strategies
In the previous sections, we’ve identified and discussed various obfuscation techniques often found in GuLoader, including:
- Opaque predicates
- Obfuscated arithmetic expressions
- And junk instructions.
Now, let’s focus on developing techniques and strategies to overcome these obfuscation methods and make the code easier to analyze.
What’s more, we will show the state of the code before and after deobfuscation. You’ll see how using various deobfuscation techniques can render the code more readable and simplified for analysis.
“Nopping” all XMM instructions
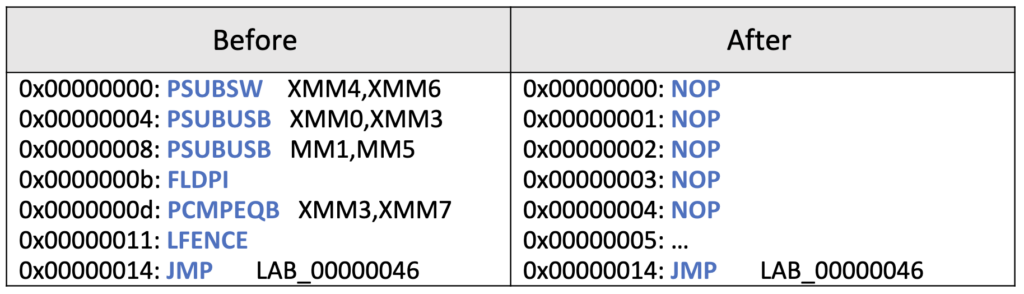
As previously noted, XMM instructions can complicate the analysis process due to their obfuscating impact on the code. Fortunately, our analysis shows that all of the XMM instructions used in GuLoader are extraneous and don’t influence the code’s intended behavior. These instructions are essentially pointless, as the outcome of their execution is never utilized.
The result of “Nopping” all XMM instructions can be seen in the following table:
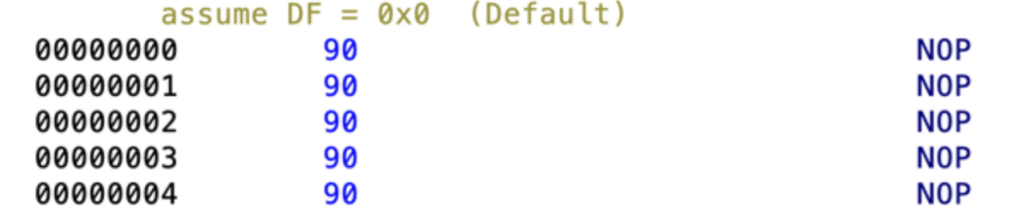
And here’s the achieved result of “Nopping” all XMM instructions in Ghidra:
Leaving Unconditional JMP Instructions Untouched
When analyzing GuLoader, it can be tempting to remove unconditional JMP instructions to streamline the code and make it easier to read. But, it requires a lot of time and effort.
Additionally, the disassembler in decompiled code can often do a good job of concatenating blocks and making the code more legible, even with the presence of these unconditional jumps. Thus we decided to leave small blocks and not concatenate them.
“Nopping” Junk Instructions
Junk instructions are those that do not affect the execution flow of the code and can be safely removed. One of the expected results of “nopping” all junk instructions is represented it the following table:

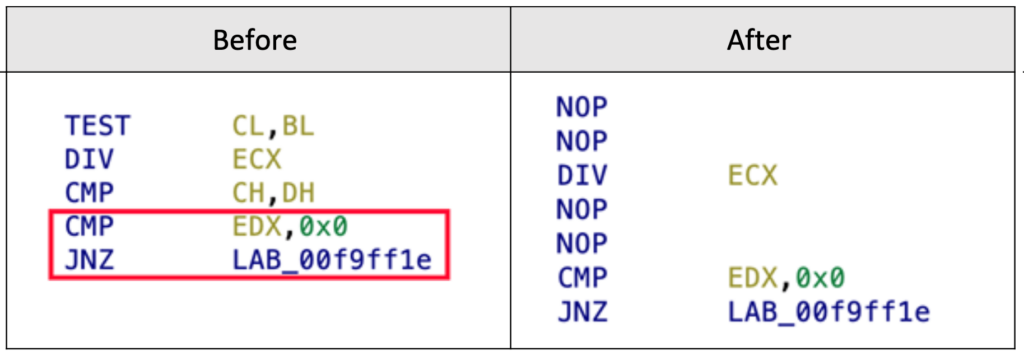
Defeating fake comparison instructions
Dealing with fake comparison instructions can be a bit more difficult than simply “nopping” junk instructions. Unlike junk instructions, we can’t just remove any comparison instruction we come across, because it may actually be needed for the code to function correctly. To handle this, we need to carefully identify which comparisons are fake and can be removed.
One way to do this is to “mark” any comparison instruction we encounter, and then look for any subsequent instructions that may use the result of the comparison. If no such instructions are found, we can safely replace the comparison instruction with a NOP. If we encounter a conditional jump or another instruction that may use the comparison result, we need to “unmark” the previous comparison so that it is not removed.
An example of properly “nopping” out junk comparison instructions is illustrated in the following table. As shown, all comparison instructions except for “CMP EDX,0x0” have been removed:
Defeating fake PUSHAD instructions
Our investigation revealed that all “PUSHAD” instructions used in the GuLoader code are useless. So, we simply nop the “PUSHAD” and “POPAD” instructions, and everything in between them:
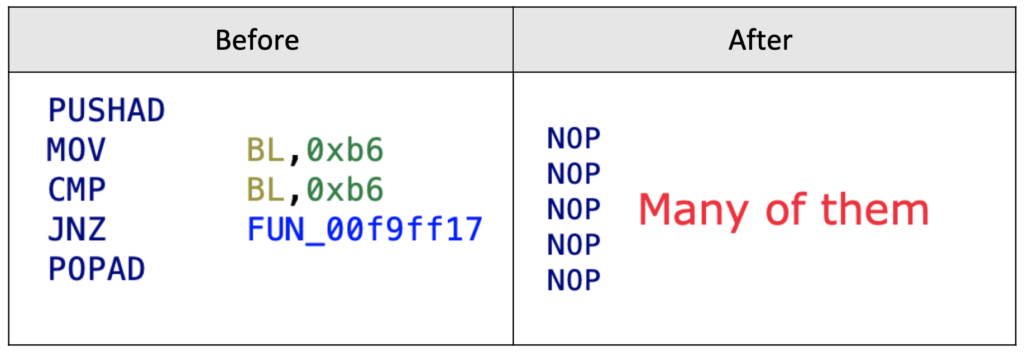
Note that not all “POPAD” instructions found in the GuLoader code are junk. Some of them may not have a corresponding “PUSHAD” instruction. In such cases, we leave the “POPAD” instruction untouched.
Defeating fake PUSH instructions
Cleaning up fake PUSH instructions is akin to handling fake PUSHAD instructions, but we need to make sure that the registers that are not pushed remain unaffected.
Opaque predicates
Overcoming opaque predicates might appear challenging initially, as it requires “predicting” the jump condition. However, in our case, it’s relatively straightforward because all discovered opaque predicates are situated within the “PUSHAD” and “POPAD” blocks. When processing “PUSHAD” blocks, we simply nullify all opaque predicates between the “PUSHAD” and the corresponding “POPAD” instruction.
Calculating Arithmetic Expressions
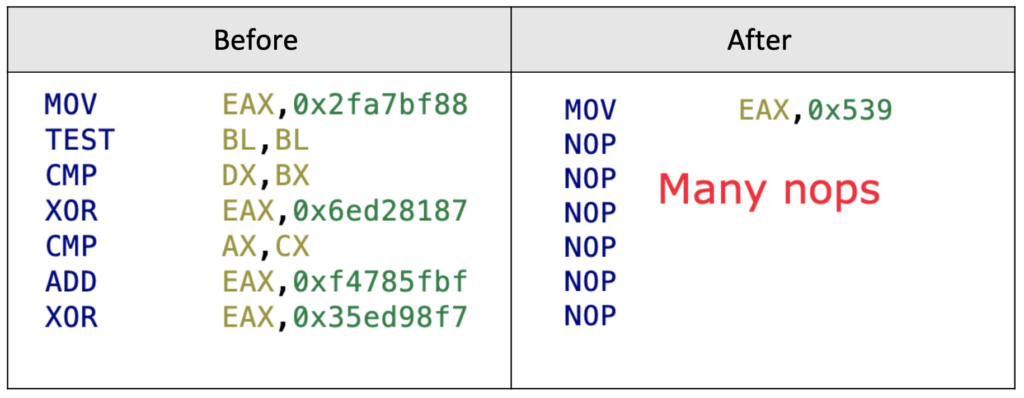
To deobfuscate the arithmetic expressions in Guloader, we follow a similar approach to the fake comparison instructions. We mark all “MOV” instructions where the second argument is a scalar value and all “PUSH” instructions where the argument is a scalar too. When we encounter an arithmetic operation, we update the constant value in the first instruction and nop the current instruction. In this way, the first met instruction will always have the result value, and the rest of the arithmetic instructions will be “nopped”.
See the following example with the optimized “MOV” operation:
Here is another example where we optimize “PUSH” instructions:
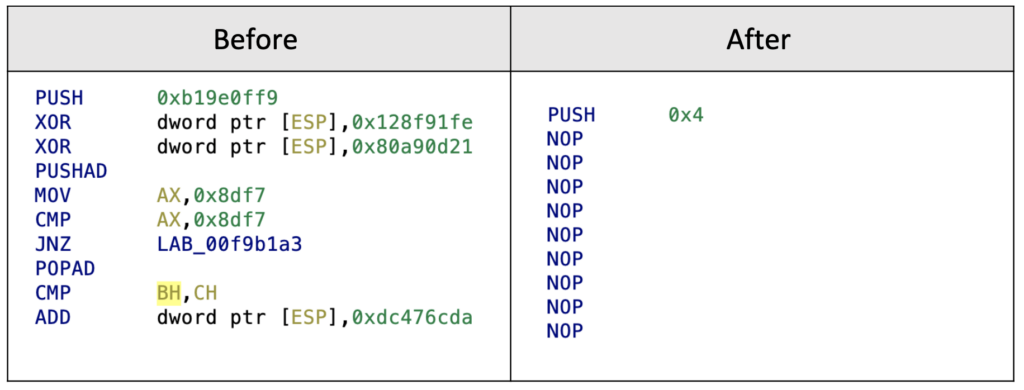
It’s important to be careful when dealing with the size of the operands – we need to ensure that we preserve the correct size when performing the arithmetic operations.
Automating Malware Analysis with a Ghidra Script
In the earlier sections, we identified typical obfuscation techniques in GuLoader’s code and discussed various strategies to overcome them. In this section, we provide a brief description of a script designed to semi-automate the deobfuscation process for GuLoader’s code.
We’ve developed a script that initiates from the chosen instruction, tracks calls and conditional jumps, simplifies, deobfuscates, and disassembles the resulting code. The script avoids jumping over calls with a specific operand value because not all calls result in returns. This script employs all the approaches we’ve discussed in previous chapters.
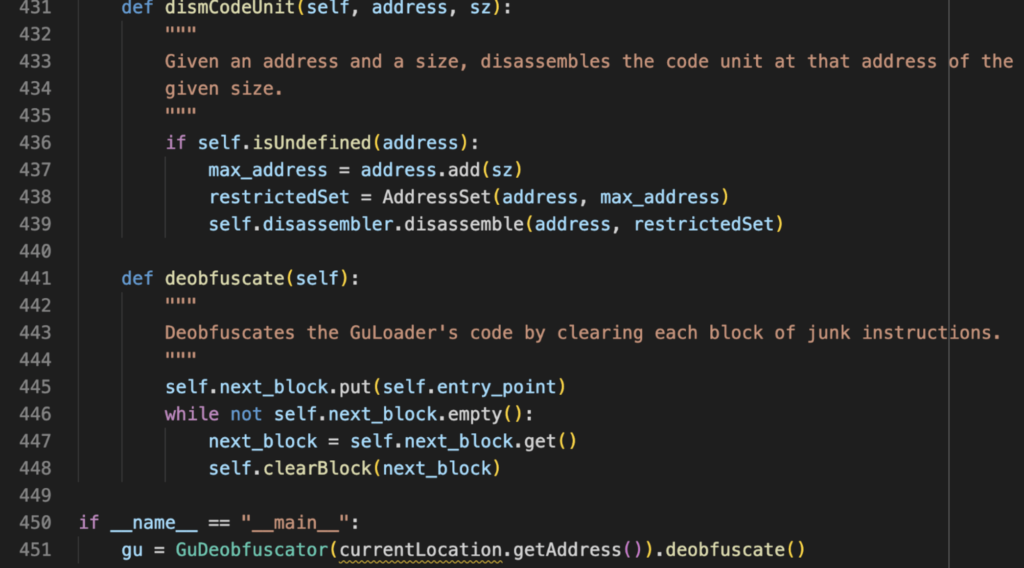
You can download this script from our GitHub repository and put it in Ghidra’s script folder. We recommend setting a hotkey for quick access. Simply place the cursor over an interesting position (you could start from the 0x0 offset) and press the hotkey to see the deobfuscated code.
Finally, let’s take a look at the pseudo-code of Guloader before and after using the deobfuscation script and compare them:
And here is the same code after deobfuscation:
Here is another example of GuLoader’s code before and after applying our deobfuscation script. Here’s the before:
And here it is after running the script:
As you can see, the code is now significantly more readable. The obfuscated instructions have been eliminated, making the code flow easy to trace.
This greatly simplifies the task for malware analysts trying to understand the malware’s behavior, making the whole analysis process considerably more efficient.
Limitations of the approach
While the semi-automated deobfuscation method with Ghidra scripting is effective, there are several limitations to bear in mind.
- It’s possible that not all obfuscated code patterns in GuLoader have been identified, and new techniques may emerge in future versions of the malware.
- There is a chance of optimization errors, where some instructions might be wrongly identified as junk or obfuscated code, and are nulled or removed.
- The script may need adjustments or updates to handle different versions of GuLoader, as there might be changes in the obfuscation techniques used.
- The script might not be able to identify all calls and jump destinations, particularly if they’re dynamically generated or encoded.
- Writing and testing the script can demand a significant amount of time and effort, as it necessitates a thorough understanding of GuLoader’s code structure and obfuscation techniques.
Despite these limitations, this approach remains a helpful tool for automating GuLoader code analysis and deobfuscation.
Wrapping up
We’ve explored one potential approach to deobfuscating GuLoader, which entails identifying common obfuscation patterns and neutralizing them using various techniques.
It’s important to note that while this approach was specifically tailored for deobfuscating GuLoader, the same general techniques could be applied to other malware samples as well. However, bear in mind that each malware sample might have unique obfuscation techniques, necessitating the development of specific optimization strategies.
Want to read more content like this?
- Learn how we analyzed the encryption and decription algorithms of PrivateLoader
- Or learn how to extract LimeRat configuration
![[10:48] Ivan Skladchikov Electron is a malware analyst at ANY.RUN](https://any.run/cybersecurity-blog/wp-content/uploads/2023/05/6394744-150x150.png)
Electron
I'm a malware analyst. I love CTF, reversing, and pwn. Off-screen, I enjoy the simplicity of biking, walking, and hiking.

5 comments


Very useful info, thanks!
Great job!
Hello! It is perfect
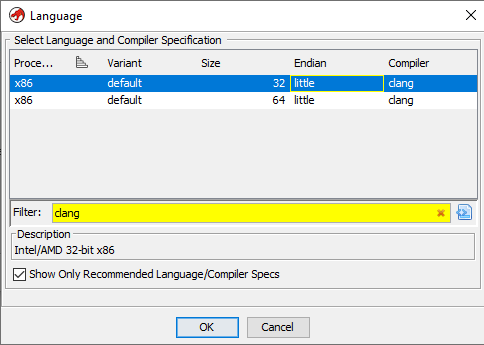
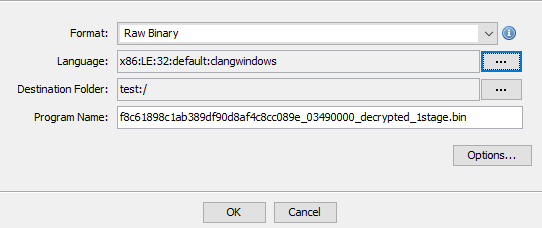
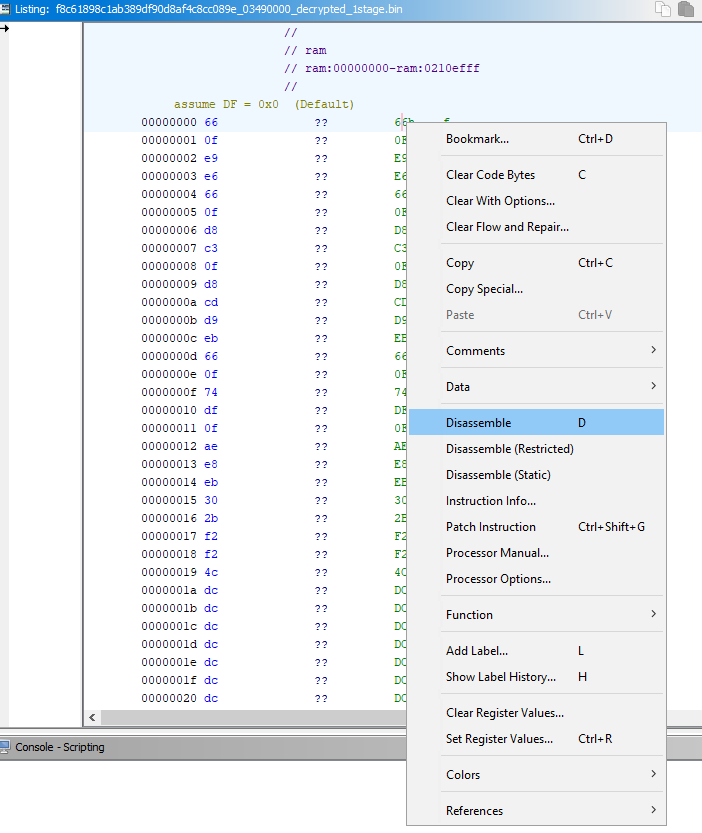
When importing the provided sample of the already unpacked shellcode into Ghidra, what language and compiler specification should I choose? Selecting x86 just loads in the raw binary and doesn’t show me any of the assembly or obfuscated code as shown in the post.
We recommend to load the shellcode in RAW mode, clang x86 LE, then press D on the null byte. Or right-click -> Disassemble (instead of D).